How To Make A Wet Mount Slide
Muz Play
Mar 30, 2025 · 6 min read
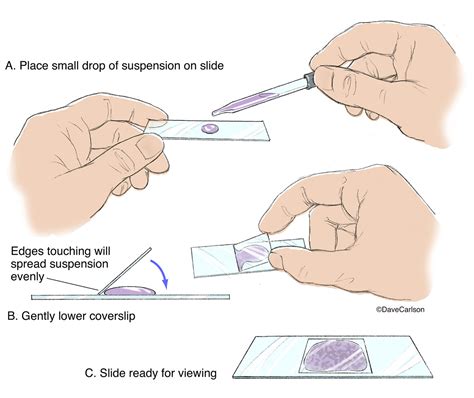
Table of Contents
How to Make a Wet Mount Slide: A Comprehensive Guide for Beginners and Experts
Creating a wet mount slide is a fundamental technique in microscopy, allowing for the observation of living organisms and specimens in their natural, aqueous environment. Whether you're a student, a hobbyist, or a seasoned researcher, mastering this technique is crucial for clear and accurate microscopic examination. This comprehensive guide will delve into the process step-by-step, covering everything from selecting the right materials to troubleshooting common issues. We'll explore various applications, from observing pond water microorganisms to examining prepared specimens, offering valuable tips and tricks along the way.
Section 1: Gathering Your Materials – Essential Equipment and Supplies
Before embarking on your wet mount creation, ensure you have all the necessary materials readily available. Improper preparation can lead to unsatisfactory results and frustration. Here’s a detailed checklist:
1.1 Microscope Slides and Cover Slips: The Foundation
- Microscope Slides: These are rectangular glass plates designed to hold your specimen. Choose slides that are clean, free of scratches, and of high optical quality for optimal viewing.
- Cover Slips: These are thin, square or rectangular pieces of glass that are placed over the specimen to flatten it and prevent damage to the microscope objective lens. Their size should be slightly larger than the specimen. Again, ensure they are clean and free of imperfections.
1.2 Specimen Preparation: The Heart of the Matter
The choice of your specimen heavily influences the success of your wet mount. Consider these aspects:
- Specimen Selection: For beginners, readily available materials like pond water, algae, or prepared specimens from a biology kit are excellent starting points. Ensure your chosen specimen is small enough to fit comfortably under the cover slip.
- Specimen Handling: Gentle handling is key. Avoid crushing delicate specimens. Use a pipette or clean forceps to transfer the specimen onto the slide.
1.3 Mounting Medium: The Key to Clarity
The mounting medium suspends the specimen and provides the necessary aqueous environment. The ideal mounting medium depends on your specimen:
- Water: Distilled water is often sufficient for many living specimens. Avoid tap water, as it may contain contaminants that can interfere with observation.
- Saline Solution: Suitable for specimens that require an isotonic environment.
- Specialized Mounting Media: For specific applications, there are specialized mounting media available. These often contain preservatives or stains to enhance visibility.
1.4 Essential Tools: For Precise Handling
- Pipettes: For precise transfer of liquids and small specimens.
- Forceps: For handling larger or more delicate specimens.
- Dissecting Needles or Probes: Useful for manipulating specimens on the slide.
- Lens Paper: For cleaning microscope slides and cover slips.
Section 2: Step-by-Step Guide to Creating a Perfect Wet Mount Slide
Follow these steps for creating a high-quality wet mount slide:
2.1 Cleaning Your Slides and Cover Slips: A Crucial First Step
Cleanliness is paramount. Use lens paper to gently wipe both the microscope slides and cover slips, removing any dust, fingerprints, or debris that could interfere with viewing.
2.2 Placing the Specimen on the Slide: Precision is Key
Using a pipette or forceps, carefully place your specimen in the center of the microscope slide. Ensure the specimen is spread out appropriately; too concentrated a sample can hinder observation.
2.3 Adding the Mounting Medium: The Right Amount Matters
Using a pipette, add a small drop of your chosen mounting medium (usually water or saline solution) directly onto the specimen. Avoid adding too much, which can lead to overflowing and blurry images. A single drop is usually sufficient.
2.4 Carefully Applying the Cover Slip: Avoiding Air Bubbles
This step requires a delicate touch. Hold the cover slip at a 45-degree angle and gently lower it onto the specimen and mounting medium. Slow and steady lowering minimizes air bubble formation. If bubbles do appear, try gently tapping the cover slip to dislodge them.
2.5 Inspecting Your Slide: Checking for Imperfections
Before placing the slide under the microscope, inspect it to ensure that there are no large air bubbles, excessive mounting medium overflow, or uneven distribution of the specimen. Any imperfections can compromise the quality of your observation.
2.6 Viewing Under the Microscope: Observing your Specimen
Place your prepared wet mount slide onto the microscope stage, secure it, and begin your observation. Start with the lowest magnification and gradually increase as needed to achieve optimal visualization of your specimen. Adjust the focus and lighting accordingly.
Section 3: Troubleshooting Common Issues in Wet Mount Preparation
3.1 Air Bubbles: A Frequent Culprit
Air bubbles are a common problem during wet mount preparation. Slow and steady application of the cover slip is the best preventative measure. If bubbles persist, gently tapping the cover slip might help. In some cases, using a smaller volume of mounting medium can also reduce bubble formation.
3.2 Excessive Mounting Medium: A Blurring Effect
Too much mounting medium can lead to blurring and distortion. Use a small drop only. Excess mounting medium can be gently removed with a tissue or absorbent paper, but be careful not to dislodge the cover slip.
3.3 Specimen Movement: A Challenge for Live Organisms
Keeping a live specimen still can be challenging. For smaller organisms, using a slower, more gentle technique when placing the cover slip can help. You can also try using a slightly thicker mounting medium to slow down movement. For some specimens, adding a small amount of methylcellulose to the mounting medium can help to slow down movement.
3.4 Cover Slip Slipping: Ensuring a Secure Mount
If the cover slip moves or slips, ensure the slide is clean and dry. A slightly thicker mounting medium can also enhance adhesion.
Section 4: Advanced Techniques and Applications
4.1 Staining Techniques: Enhancing Visibility
For better visualization of certain cellular structures, staining techniques can be employed. Simple stains like methylene blue can highlight cell walls and nuclei, while more complex staining protocols might be needed for specific applications. Always follow appropriate safety guidelines when handling stains.
4.2 Using Specialized Mounting Media: Tailored to Specific Needs
For certain specimens or applications, specialized mounting media, such as glycerin jelly or immersion oil, might be necessary. These specialized media provide specific properties, such as improved preservation or enhanced refractive index, which improve the quality of observation.
4.3 Preparing Slides for Long-Term Observation: Preserving Specimens
For long-term storage, consider using preservatives in your mounting medium. This will help to prevent specimen degradation and maintain the quality of your slide for extended periods.
4.4 Observing Different Specimens: Expanding your Microscopy Skills
Wet mount techniques apply to a vast range of specimens. Explore different types of specimens, from cheek cells to pond water microorganisms, expanding your microscopic exploration and understanding of the microscopic world.
Section 5: Safety Precautions: Handling Chemicals and Glassware
Microscopes, slides, and cover slips are made of glass and can break, resulting in cuts. Handle them carefully. Always use eye protection when working with chemicals, especially stains. Dispose of used mounting media and stains properly according to the safety guidelines provided.
Section 6: Conclusion: Mastering the Art of Wet Mount Slides
Creating a successful wet mount slide requires practice and attention to detail. By carefully following the steps outlined in this guide and understanding the common challenges, you will improve your microscopy skills. Remember to practice regularly, experiment with different specimens and techniques, and gradually explore more advanced methodologies. The world of microscopy is rich and rewarding, and mastering the art of wet mount preparation is the gateway to many fascinating discoveries. Enjoy the journey of exploring the microscopic world around you!
Latest Posts
Latest Posts
-
How To Find Pmf From Cdf
Apr 01, 2025
-
Area By Integration Problems With Solutions
Apr 01, 2025
-
What Do Carbohydrates Do For The Cell Membrane
Apr 01, 2025
-
Why Are Plants So Important To Humans And Other Animals
Apr 01, 2025
-
Identify The Body Cavities In The Following Illustration
Apr 01, 2025
Related Post
Thank you for visiting our website which covers about How To Make A Wet Mount Slide . We hope the information provided has been useful to you. Feel free to contact us if you have any questions or need further assistance. See you next time and don't miss to bookmark.
