How To Draw Lewis Structures For Ionic Compounds
Muz Play
Mar 30, 2025 · 7 min read
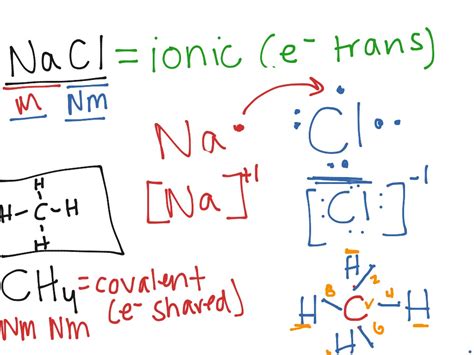
Table of Contents
How to Draw Lewis Structures for Ionic Compounds
Lewis structures, also known as Lewis dot diagrams, are visual representations of the valence electrons in an atom or molecule. While commonly associated with covalent compounds, understanding how to apply them to ionic compounds provides a deeper insight into the bonding process and the resulting structures. This comprehensive guide will walk you through the process of drawing Lewis structures for ionic compounds, highlighting key differences from covalent structures and providing examples to solidify your understanding.
Understanding Ionic Bonding
Before diving into drawing Lewis structures, let's establish a firm understanding of ionic bonding. Ionic bonds form when there's a significant difference in electronegativity between two atoms. One atom, typically a metal, readily loses one or more electrons to achieve a stable electron configuration (often a full outer shell), becoming a positively charged cation. The other atom, usually a nonmetal, gains these electrons, achieving a stable configuration and becoming a negatively charged anion. The electrostatic attraction between these oppositely charged ions forms the ionic bond.
Key Differences from Covalent Bonding
Unlike covalent bonding, where atoms share electrons to achieve stability, ionic bonding involves the complete transfer of electrons. This fundamental difference impacts how we represent the bonding using Lewis structures. In covalent structures, we show shared electron pairs using lines. In ionic structures, we focus on representing the charges of the ions and the electrostatic attraction between them.
Steps to Draw Lewis Structures for Ionic Compounds
Drawing Lewis structures for ionic compounds is a simplified process compared to covalent compounds. Here's a step-by-step approach:
1. Identify the Cation and Anion:
The first step is to determine the constituent ions within the ionic compound. This often involves recognizing the metal and non-metal components. For example, in sodium chloride (NaCl), sodium (Na) is the cation, and chlorine (Cl) is the anion.
2. Determine the Charge of Each Ion:
Next, determine the charge of each ion. Metals typically lose electrons to form cations with a positive charge. Nonmetals gain electrons to form anions with a negative charge. Understanding periodic trends can assist in this process. Group 1 metals (like Na, K) usually form +1 cations, Group 2 metals (like Mg, Ca) form +2 cations, and halogens (like Cl, Br, I) often form -1 anions. Transition metals can form multiple charges, requiring additional information (often provided in the compound's name or formula).
3. Write the Electron Configurations (Optional but Helpful):
Writing the electron configuration of each atom can help visualize the electron transfer process. This helps solidify your understanding of why the ions form their respective charges. For instance, sodium (Na) has an electron configuration of [Ne]3s<sup>1</sup>. It readily loses one electron to achieve the stable noble gas configuration of Neon ([Ne]). Chlorine (Cl) has [Ne]3s<sup>2</sup>3p<sup>5</sup> and readily gains one electron to achieve the stable [Ar] configuration.
4. Draw the Lewis Dot Structures for the Individual Ions:
Draw the Lewis dot structures for each ion, representing the valence electrons as dots around the element symbol. For cations, remove the appropriate number of dots based on the ion's charge. For anions, add the appropriate number of dots to represent the gained electrons. Note that the number of dots should now represent the number of electrons in the outermost shell of the respective ions, representing their stable configurations.
5. Show the Electrostatic Attraction (Ionic Bond):
This step is crucial in distinguishing Lewis structures for ionic compounds from covalent ones. While we don't directly depict shared electron pairs with lines, we represent the electrostatic attraction between the cation and anion using brackets and charge indicators. Enclose each ion within brackets and write the ion's charge (e.g., [Na]<sup>+</sup>, [Cl]<sup>-</sup>). You can optionally use an arrow to show the electron transfer to visually represent the interaction.
6. Overall Structure (For More Complex Compounds):
For simple binary ionic compounds (e.g., NaCl, MgO), steps 1-5 are sufficient. However, for more complex compounds with polyatomic ions (e.g., (NH₄)₂SO₄), you will need to draw Lewis structures for each polyatomic ion individually before showing their interactions with other ions. In these cases, you should represent the polyatomic ions in brackets with their overall charge and depict the ionic interaction with other ions.
Examples
Let's illustrate the process with a few examples:
Example 1: Sodium Chloride (NaCl)
- Ions: Na<sup>+</sup> (cation), Cl<sup>-</sup> (anion)
- Charges: Na<sup>+</sup> (loses one electron), Cl<sup>-</sup> (gains one electron)
- Electron Configurations (Optional): Na: [Ne]3s<sup>1</sup> → Na<sup>+</sup>: [Ne]; Cl: [Ne]3s<sup>2</sup>3p<sup>5</sup> → Cl<sup>-</sup>: [Ar]
- Lewis Dot Structures:
- Na<sup>+</sup>: [Na]<sup>+</sup> (no dots, as it has lost its valence electron)
- Cl<sup>-</sup>: [ :Cl:]<sup>-</sup> (eight dots, representing a full octet)
- Electrostatic Attraction: [Na]<sup>+</sup> [ :Cl:]<sup>-</sup> (often represented with a simple arrow from Na to Cl to show the electron transfer)
Example 2: Magnesium Oxide (MgO)
- Ions: Mg<sup>2+</sup> (cation), O<sup>2-</sup> (anion)
- Charges: Mg<sup>2+</sup> (loses two electrons), O<sup>2-</sup> (gains two electrons)
- Electron Configurations (Optional): Mg: [Ne]3s<sup>2</sup> → Mg<sup>2+</sup>: [Ne]; O: [He]2s<sup>2</sup>2p<sup>4</sup> → O<sup>2-</sup>: [Ne]
- Lewis Dot Structures:
- Mg<sup>2+</sup>: [Mg]<sup>2+</sup> (no dots)
- O<sup>2-</sup>: [:Ö:]<sup>2-</sup> (eight dots)
- Electrostatic Attraction: [Mg]<sup>2+</sup> [:Ö:]<sup>2-</sup>
Example 3: Ammonium Sulfate ((NH₄)₂SO₄)
This example involves polyatomic ions. We'll break it down step by step:
- Ammonium ion (NH₄)<sup>+</sup>: Nitrogen forms covalent bonds with four hydrogen atoms. The nitrogen shares its five valence electrons with the four hydrogens, and one of these electrons is given to form a positive charge.
- Sulfate ion (SO₄)<sup>2-</sup>: Sulfur forms covalent bonds with four oxygen atoms. Sulfur shares its six valence electrons to make a total of eight around each oxygen. Two extra electrons are gained to form the 2- charge.
Then, you would represent the electrostatic interaction between the two polyatomic ions. Note that this Lewis structure focuses on the individual ionic interactions within the polyatomic ions and then the ionic interaction between the polyatomic ions as a whole.
Advanced Considerations
- Lattice Energy: Lewis structures don't directly illustrate the three-dimensional crystal lattice structure of ionic compounds. However, understanding that the structure is driven by the strong electrostatic forces between cations and anions is crucial.
- Polyatomic Ions: As demonstrated in the ammonium sulfate example, dealing with polyatomic ions requires careful consideration of both covalent and ionic bonding principles. Mastering Lewis structures for polyatomic ions is essential for representing complex ionic compounds effectively.
- Limitations: Lewis structures, while helpful, have limitations. They don't provide information about the geometry or bond angles of ionic compounds. More advanced techniques are needed for those aspects.
Conclusion
Drawing Lewis structures for ionic compounds simplifies the representation of ionic bonding, emphasizing the transfer of electrons and the resulting electrostatic attraction between ions. While not as detailed as the structures for covalent compounds, mastering this technique is crucial for a deeper understanding of the nature of ionic bonding and the properties of ionic compounds. By following the steps outlined above and practicing with various examples, you will strengthen your understanding of chemical bonding and improve your ability to visualize the interactions between atoms in ionic compounds. Remember to always identify the ions, determine their charges, and clearly show the electrostatic attraction as the defining feature of your Lewis structure for ionic compounds.
Latest Posts
Latest Posts
-
Titration Of Fruit Juice Lab Answers
Apr 01, 2025
-
Electric Field Lines About A Point Charge Extend
Apr 01, 2025
-
Does Ionization Energy Increase Across A Period
Apr 01, 2025
-
Integration By Parts How To Choose U And Dv
Apr 01, 2025
-
Protein Synthesis Takes Place In The
Apr 01, 2025
Related Post
Thank you for visiting our website which covers about How To Draw Lewis Structures For Ionic Compounds . We hope the information provided has been useful to you. Feel free to contact us if you have any questions or need further assistance. See you next time and don't miss to bookmark.
